
The CMS platform WordPress is one of the most popular ones to build your homepage on the web. Therefore it can be a natural starting place for enabling quote requests by customers and distributors (RFQ).
We have developed a free wordpress plugin to easily embed your visual product configurator on your favorite WordPress website and provide a starting point for configuration and a low budget customer portal.
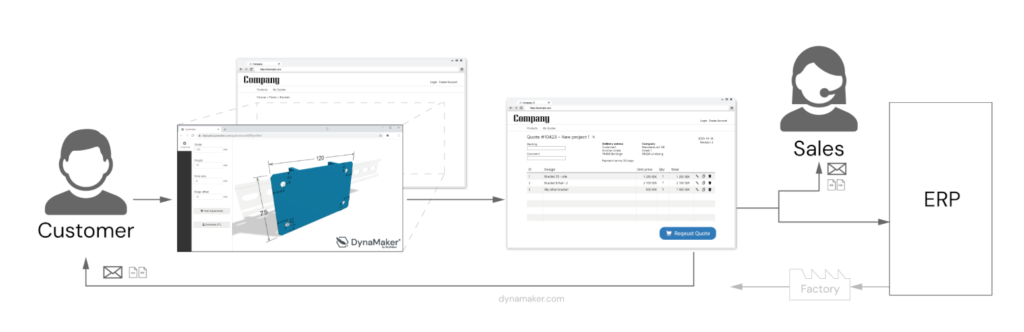
The WordPress plugin aims to help with a quick start to engage customers via your website and start driving sales through quotation requests. See example of workflow below where the following blocks have been added to pages: configurator block: configurator block, checkout block and history block.
The plugin can be installed from the wordpress plugin store and helps with the following areas:
- Easily add blocks for buttons or embedding Visual product configurator on any page (iframe), with or without login.
- Setup a lightweight customer portal to collect multiple configurations in a checkout before submitting
- Trigger e-mail or other automation through an http endpoint (Power Automate, Zapier, etc)
How to add a Visual CAD-configurator to your website with a block
- Login as administrator to your wordpress site.
- Install and activate the dynamaker wordpress plugin
- Go to a page you want to edit and press the create button with the + icon (requires the WordPress standard Gutenberg block editor)
- Search for DynaMaker among the blocks in the left toolbar and select the DynaMaker Iframe block (or a regular button)

- Click on block that has been added to your page and open the block settings to the right

- Fill in the unique APP id for your DynaMaker CAD-configurator (last part of the url) and some optional styling fields
- Press save (or publish) and you should see the embedded configurator on your webbsite (no preview available in editor)
- Add your own CSS styling if you want the frame and behavior to be different (in addition to optional styling in block settings)
How to setup a low budget customer portal in WordPress
The wordpress plugin comes with a lightweight RFQ portal functionality setup to get you started in small steps. Here are the steps with some images from the RFQ setup instructions.
- Login as administrator to your wordpress site
- Install and activate the dynamaker wordpress plugin (same as above)
- Create a new page intended for handling the checkout of configuration request (if multiple) and press the create button (+)
- Search for DynaMaker among the blocks in the left toolbar and select the RFQ Portal Checkout
- Save & Publish the page (further configuration in settings)

- Navigate to the wordpress Settings in the admin menu and go to DynaMaker Plugin
- Specify the relative url to the Checkout page you just created (eg. /checkout-request) in the top field

- (Optional) Define your custom checkout fields for the user (default is just description and the logged in users email)
- (Optional) Enable saving of the requests in the WordPress database (so you users can view them later)
- (Optional) If you want the user to view their previous quote request (enable save required) you can create a new page and add the Block RFQ Portal Request List where you want the list to show up
- Ensure that your DynaMaker App has a “Request quotation” button that sends postMessage with the configuration data in the format of wordpress.returnConfigurationData (see installation instructions and docs about embedding configurators)
- Test your configuration by going to the page with the product configurator and press “Request Quotation”. If everything is correct you should be redirected to the checkout page and see your first item there.
Are you interested in getting started but don’t know where to start? Contact the team and we will help you.